My latest Project Life Style Video featuring simple tips to use those 'not-so-great' photos. Hope this is inspiring. Thanks for watching.
Feb 9, 2016
Scrapbook 100 photos in 1 evening - Session 4 & kit overview
This week I had some technical difficulties - I ended up losing the footage of my process of creating the layouts in this session. It happens. So I ended up doing a quick overview of each layout I got done and shared what is left in my kit - stash items that I want to use up.
Upon doing this challenge, I now have a better understanding of my stash - why some items tend to hang around and not get used. Even with this challenge, I am shying away from using certain papers and colors for one reason or another. This teaches me about myself and my scrappin' style. Though I may be getting a good deal at the time, or truly love how pretty something is - I have to really think, "will I use it?" It really doesn't do any good to have pretty things, or cheap things - sitting on a shelf. So far what is left in my kit, which I pulled from my stash - is lots of busy and bold/bright colored papers. Which I can truly say is a challenge for me. I think it's because I feel it takes too much attention away from my photos and I feel I have to hide it or it's so pretty I want to showcase it instead of my pictures. Either way, I know my struggle - it shows in what is left in my stash and it shows when I try to use it - I have a hard time.
If you can, take a moment to sift through some of your stash. Try to sort out items that you know you will never use, maybe it came in a kit or was an impulse buy. Then maybe sort things you love that you think is too pretty to use. Then sort by ones you know you'll use in the very near future. To get through your stash - I would suggest using up those items you chose knowing you would use them. Use them first. They may make it easier to create projects with. Then the pretty paper - cut it up - either into a 6x12 strip, 4x12 strips, or mutiple 6x6s. Once it's cut, you may be better inclined to use it up. The other papers that you know you will never use, it's not your style, the colors are not to your taste, or they are seasonal and you just held on to them too long - give them away. Donate to another scrappy friend, a school, or even a second hand store.
I hope this little bit of information may give you some inspiration to work through some of your stash. Thank you for sticking with me on this challenge - I have hit the halfway mark and getting more layouts done at one time than ever before and truly getting my photos out of the box and onto layouts. Not to mention, making a small dent in my stash too!
I hope you enjoy the video.
Jan 30, 2016
Scrapbook 100 photos in 1 evening | Session 3 video
Wow! Each session seems to go faster and faster. This time around, I got 3 layouts done in less than 1 hour!! Truly a first for me! I am making great progress too with my box of photos. I see a small 'dent' forming and it feels so great to see the stack of completed layouts growing!
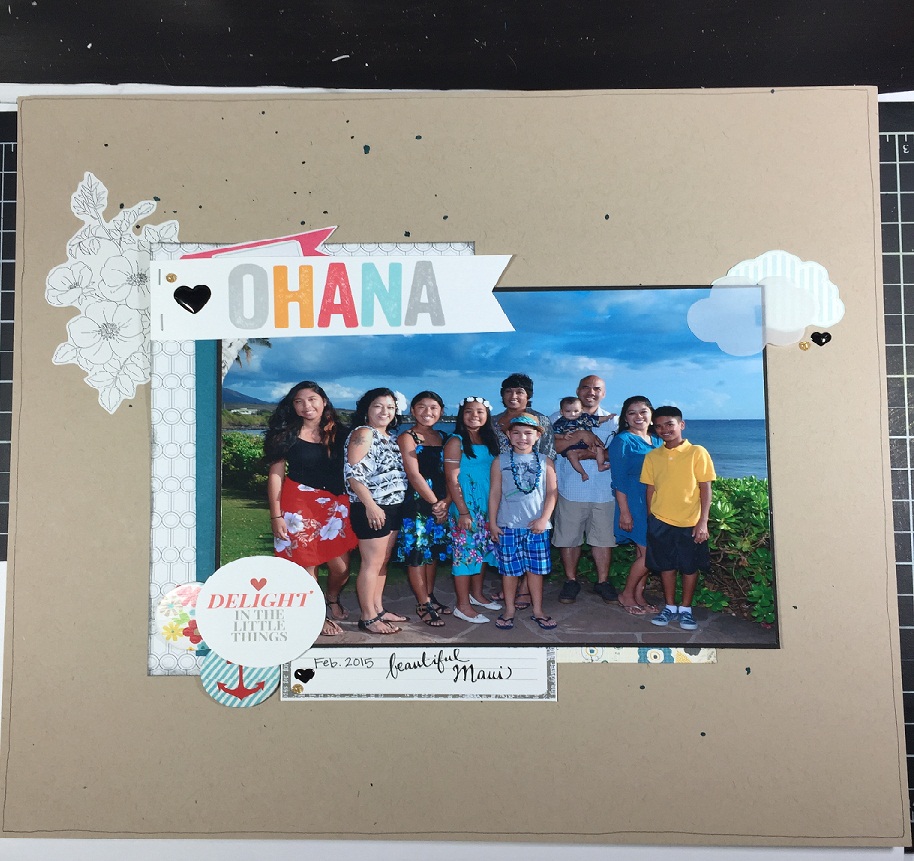
My first layout took the longest of the 3. I think its that time my head needs to get in the creative mood. I also decided to start with only 2 photos on this first layout - which also posed a challenge to 'fill up' or design the entire page when there was more blank space to deal with.
I made it through, with a fun and easy technique - faux paint splatters! I simply used my white gel pen to help fill the page and get the look of white paint. It turned out great and was quick and easy - no drying time required.
All in all, I am so happy with how far I've come along with this challenge. I am almost halfway through my 'one evening' time frame and I am so excited to see how much further I get along and what other new tricks or tips I will learn.
I hope you enjoy this video of my third session and I hope you like the layouts too.
Thanks for stopping by today!
Jan 23, 2016
Scrapbook 100 photos challenge | Session 2 - video
I made it to the second scrapbooking session of this challenge and I have to say, I did much better than my first session. Each layout went quicker and I used more photos. And when I say quicker I mean QUICK! I can actually say I made a layout in 15 minutes!! Yes, I said 15 minutes!! This challenge has truly got me to do aMaZiNg things!!
(happy dance complete) :)
In this session, the photos I had were from one event - a camping trip. Even though all the photos were from the same time and event, I didn't make the layouts the same, nor do they match each other. I don't think that is necessary to do - I see each layout as unique and work with them as individual pages. Even though I still had the same kit of supplies to choose from, each layout turned out different from each other and I was able to use designer paper that was in my stash for a long time. So multiple successes here.
 I discovered this time around that the more photos you have on one layout - there is less room to embellish. This may seem like an obvious observation, but I typically only scrap 1-3 photos on a layout - so to scrap more like 6 on one layout is new for me. This simple reality I think helped make these layouts a snap to put together...of course along with having my pre-chosen supplies and a base sketch to go off of.
Two sessions down, I've only used up 2 hours and 15 minutes of my 7 hour challenge, and I have put 24 photos on layouts - out of the 100 goal. I think I'm moving along well.
Check out my video below to see session 2 and how my layouts turned out. Thanks for stopping by and I'll see you in my next session of this challenge! Get scrapping!
(happy dance complete) :)
In this session, the photos I had were from one event - a camping trip. Even though all the photos were from the same time and event, I didn't make the layouts the same, nor do they match each other. I don't think that is necessary to do - I see each layout as unique and work with them as individual pages. Even though I still had the same kit of supplies to choose from, each layout turned out different from each other and I was able to use designer paper that was in my stash for a long time. So multiple successes here.
I discovered this time around that the more photos you have on one layout - there is less room to embellish. This may seem like an obvious observation, but I typically only scrap 1-3 photos on a layout - so to scrap more like 6 on one layout is new for me. This simple reality I think helped make these layouts a snap to put together...of course along with having my pre-chosen supplies and a base sketch to go off of.Two sessions down, I've only used up 2 hours and 15 minutes of my 7 hour challenge, and I have put 24 photos on layouts - out of the 100 goal. I think I'm moving along well.
Check out my video below to see session 2 and how my layouts turned out. Thanks for stopping by and I'll see you in my next session of this challenge! Get scrapping!
Jan 17, 2016
Scrapbook 100 photos Challenge | Session 1 - Video

- Deciding on the photos to use
- Sticking to the sketch
- Sticking to the pre-made kit of supplies
- Timing myself
- Making decisions and going with it
I found that if I stuck to the sketches and the items in my kit - I would have finished each layout more quickly. Each time I started looking through my stash or pulling stamps out - took time that I originally wasn't planning on spending. Some layouts just 'need' that little extra something though - which I'm okay with. But for this challenge I want to keep to my kit.
Now after this first session, I've added enameled dots to my kit as well as 1 alpha stamp set that also includes numbers. This I hope will minimize the time I'm spending searching for embellishments during my next sessions.
To see how I did - check out my video below. Overall, I'm very pleased with the outcome of this first session. I never made this many layouts in such a short time - EVER! It feels great! I know I'm going to have a great sense of accomplishment by the end of this challenge!
Jan 12, 2016
Scrapbook 100 photos in one evening | Supplies
Besides selecting my photos I then had to select what supplies I would use. I am trying to "bash my stash" this year, and I recently came across a Facebook group 2016 Bash Your Stash Challenge where they are encouraging us to use our stash and not purchase anything new for the entire year. Besides this motivation to use my stash, I also had this challenge to scrap my 100 photos in an evening so they went hand in hand - needless to say I am motivated to get scrappin'.

Here's what I chose to make my kit from my stash as I get ready for my 100 photo challenge.(see my previous post for my introduction of this challenge. Scroll below for introduction video.)
Since my photos do not match or go together, they cover multiple years and varying events. This adds to the complexity of making a kit that will work. To combat this I mostly stuck with neutral colors and patterns. I also tried to use papers that already matched with each other that came in a package together or are from the same product line. My newest products came from the 2015 Scrapbooking Expo last summer - so I still had new sheets that I had not yet cut into - so these were first on my list to add to my kit. Here's a photo of the papers I chose to work with. There are some pops of color which is fine but those brighter patterns are from a paper pad I got so I knew they would go together and I like having the option to add pops of color as I would like to when making my layouts.
 Now with my paper chosen, it makes it easier to select embellishments. Again, I tried to stick to neutrals. I dug into my alphabet letter stash and my number sticker stash - which are organized by color - and selected my gray, black, and white alphas. I also selected a few stickers that I thought would work too - color is the driving force here. Will they go together on a page well? That's what I was thinking about when making my selections. Not size, not brand, not anything else - just color.

I did not select 'actual' embellishments since I didn't really know what events my photos were covering - and I like to choose my accents more on the fly. When I make the layout, I see how much space I have, what the topic is about, and what color accent I would like. Since I will be in a time crunch, embellishments will be minimal, and we'll see how I do with selecting from my stash on the go or if I leave out embellishments all together. We'll just have to see how it goes. For my kit though, besides my sticker labels - these are the only pre-selected accents I have put together for this challenge.
After I have my scrapping supplies, it was time to get my tools together. Here is the list of my tools I chose to have in my kit:

Introduction Video

Here's what I chose to make my kit from my stash as I get ready for my 100 photo challenge.(see my previous post for my introduction of this challenge. Scroll below for introduction video.)
Since my photos do not match or go together, they cover multiple years and varying events. This adds to the complexity of making a kit that will work. To combat this I mostly stuck with neutral colors and patterns. I also tried to use papers that already matched with each other that came in a package together or are from the same product line. My newest products came from the 2015 Scrapbooking Expo last summer - so I still had new sheets that I had not yet cut into - so these were first on my list to add to my kit. Here's a photo of the papers I chose to work with. There are some pops of color which is fine but those brighter patterns are from a paper pad I got so I knew they would go together and I like having the option to add pops of color as I would like to when making my layouts.
 Now with my paper chosen, it makes it easier to select embellishments. Again, I tried to stick to neutrals. I dug into my alphabet letter stash and my number sticker stash - which are organized by color - and selected my gray, black, and white alphas. I also selected a few stickers that I thought would work too - color is the driving force here. Will they go together on a page well? That's what I was thinking about when making my selections. Not size, not brand, not anything else - just color.
I did not select 'actual' embellishments since I didn't really know what events my photos were covering - and I like to choose my accents more on the fly. When I make the layout, I see how much space I have, what the topic is about, and what color accent I would like. Since I will be in a time crunch, embellishments will be minimal, and we'll see how I do with selecting from my stash on the go or if I leave out embellishments all together. We'll just have to see how it goes. For my kit though, besides my sticker labels - these are the only pre-selected accents I have put together for this challenge.
After I have my scrapping supplies, it was time to get my tools together. Here is the list of my tools I chose to have in my kit:

- large Fiskars paper trimmer
- Scotch Advanced Tape Glider (ATG)
- Paper Snips scissors - from Stampin' Up!
- 01 American Crafts Precision Pen - black
- 03 American Crafts Precision Pen - black
- Uni-ball Signo white gel pen
- 2 way glue pen - Stampin' Up!
- Date roller stamp - from office supply store
- 0.3 Hi Tec C fine line pen - black
Introduction Video
Scrapbook 100 Photos in One Evening | Get Ready & Introduction Video
"Okay, hold up there. I know what you're thinking: "I can't scrapbook 100 photos in an evening." But before you...[dismiss] this idea; listen up! I, too, previously laughed off this unfathomable idea. "100 Photos? Seriously?" But that was before I learned the secret to guaranteed success...[a]ll you need is a formulated design strategy and a strong plan prior to "go" time." - Creating Keepsakes September 2011, p.43-55.
This was the opening statements in the article I found while I was purging my old scrapbooking magazines. This article was one that I actually folded the page down for me to refer to later, so now almost 5 years later, I'm getting back to this article and actually going to try it out. I am in that purging mode to clean out my stash and I came across an Iris container full of printed photos just waiting to be put in albums. This challenge came just in time and I hope you will follow me as I try to do this seemingly impossible challenge. I've never done anything like this before. I typically take 1-2 hours to create 1 layout and usually they have 2 or 3 photos at the most on each of them. So this will definitely be challenging, but I will try to follow the suggestions and see if I can do it. Yes, I can do it. I hope I can.
 First off, my interpretation of 'one evening' is about 6-8 hours. The article didn't specify how long one evening should be...but I think I'm safe if I go with 7 hours. Let's make that the challenge. Scrap 100 photos in 7 hours! Seems a bit out there, but I'm up for the challenge! Let's get these photos out of the box and into albums - yay!
Let's Get Ready... (directly from the Creative Keepsakes article)
- Select a theme. Choose what type of layouts or album you want to create (i.e. year in review, holidays, baby, etc.)
- Select a design strategy. Choose a simple design that can be used and reused throughout your entire album. Keep it simple. Keep it consistent.
- Select a formula. Use one of our predetermined formulas or feel free to create your own. Whatever it is, write it down, and stick to it.
Get Set...
- Select photos. With your strategy in mind, review your photos, and select the amount called for in your formula.
- Print and trim photos. Since you have your design plan in place, you should know exactly at what dimensions to print and/or trim your photos.
- Select products. Use one collection or a kit to simplify the selection process and provide consistency throughout the album. I can't stress this enough! When you streamline your choices, you'll finish your pages in a fraction of your normal time.
- Pre-trim/pre-print items. If you know you'll need multiple pieces of the same item, pre-trim or pre-print them now.
- Gather tools. In addition to your scrapbook products, gather your paper trimmer, ruler, scissors, and lots of adhesive.
- Purchase an album or photo sleeves. Make sure you have the proper home for your completed project.
To see how I got ready and interpreted these steps - please check out my intro video below. I didn't follow these steps exactly. I explain further how I got ready in my video, so please check it out below. Check back for my next post to see the supplies I pulled from my stash to make my kit for this challenge.
Jan 4, 2016
Fauxbonichi page & Flip Through Video
As a scrapbooker, I found it difficult to stay up to date and record daily life and activities. I looked into Project Life and actually am using this form of album to create my son's baby album. But to use it as it was intended to document each day or week - is just unrealistic for me. I don't take pictures everyday and I don't have a way to print photos and scrapbook each week or daily. I didn't want to feel so much pressure of keeping up or having such a process added to my day to day or weekly routine. (I can barely squeeze in some creative time as it is)
Since May of 2015, I started a daily journal called a Fauxbonichi - since it is a fake version of the original daily journal called the Hobonichi.
 Needless to say, just having a notebook with blank pages ready to be filled in any format and with any medium I wanted, became the best thing I ever started! It filled my desire of wanting to document day to day activities as well as be a creative outlet where I could use my scrapbooking supplies, like stamps, stickers, markers, and paper. I absolutely love this simple method of documenting my life in a creative and fun way. The best part is, there are no rules. There is no template or format you have to follow. There are no tools or products you have to use. It's totally up to me. This has been a great place for me to use up my stash of products that have been sitting on the shelf because they just don't match or they are too big or too small to work on a scrapbook layout. A journal page doesn't have to match a photo or designer paper - it's a blank slate. So I've been able to use up random stickers and finally make a dent in my alphabet sticker collection.
Here is one of my latest pages I did for January 2 to give you an idea of what a page can look like. If you want to see more and get inspired to use up some of your stash and have a daily record of your life - check out my flip through below as well as others on my You Tube Fauxbonichi playlist.
You don't need anything more than a pen and a blank journal to get started. Any journal, any pen. Add as much as you like or keep it simple to just your handwriting on the paper. However you decide to make you pages - you are documenting memories that is always fun to look back on later. Plus, if you scrapbook some photos later - you will have a written record of the day for you to look back on! Bam! Instant journaling done for your future scrapbook layouts. I love that too!
I hope you are inspired. Check out my video for ideas and I hope you decide to pick up a pen and start your own daily journal. Have fun and thanks for stopping by!
Dec 31, 2015
Scrapbooking | one 5x7 photo - process video
This layout came together quickly and easily - all using older products from my stash.
I haven't bought any new products for scrapbooking since the scrapbooking expo this summer. I finally put some of the items I got to use. This is a goal of mine for 2016 - I want to use up my stash of products and get more photos printed and put in albums.
I hope you will follow my journey as I strive to use my stash in this new year and get more layouts done than I have ever done before. In addition to traditional layouts, I am also working on my baby's one year Project Life baby album. I hope to use my stash on both these projects throughout the year. I plan on sharing my progress so stay tuned as I share some of my stash and how I use it up. Inspired by the Facebook Group I recently discovered: 2016 Bash Your Stash Challenge
For now, please enjoy the process video below. I appreciate any comments you have for me. More to come in 2016 - I'm looking forward to sharing my journey with you!
Dec 29, 2015
2016 is upon us
Well, it's no mystery that I have not been blogging. Life with a new baby has taken it's toll and my priorities have shifted - leaving my blog in the dust.
Now that a new year is upon us, I realized how much I failed this year with blogging. As I consider goals and review how I did on my previous goals I see I need a plan to keep up with all that I think I want to do next year, and blogging is one of those things.
I reviewed my goals for 2015 - which is horrible since I should have been keeping up with them throughout the year. Since my goals were not 'in front of me', I forgot what I had written down, and I didn't have a plan to reach them. So, needless to say, many of my goals went unachieved.
Now, with 2016 around the corner, I have to re-evaluate my goals. Do I want to simply carry over my same goals from this year that I didn't achieve or create new ones? What will be the plan to make these goals achievable?
As I posted previously, I have stumbled into the planner community. I discovered bullet journaling and truly feel this method will work for me. I also came across the Get to Work Book - which is a planner designed to help you tackle projects/goals and break them down into action items each week or month. I believe that if I combine these two concepts - I will actually achieve my goals and keep myself on track. With that said, what am I going to be reaching for this year?

Similarly for blogging - something once a week - I will plan a day and time each week of when I will do this. I hope this will keep me on track.
For the daily goals, I don't want to have to track it since I know I will get frustrated if I forget to mark it each day. So these, I will just have to keep myself accountable and try to pick a time each day I will do my reading.
So this is my initial plan for 2016. I decided to keep my list short this time to see if I can keep up. I hope with the exercising and new bedtime - I will feel better and have more energy to do more things for my own self development. I have a separate goal list for work which I will approach the same way - schedule time each week to work towards the goal and track my progress.
Keep an eye out for future posts of how my bullet journal is working out and how I'm doing with these goals. Hopefully you will see more posts from me and are still inspired by the projects I create.
Thanks for sticking with me.
Ezlie
Now that a new year is upon us, I realized how much I failed this year with blogging. As I consider goals and review how I did on my previous goals I see I need a plan to keep up with all that I think I want to do next year, and blogging is one of those things.
I reviewed my goals for 2015 - which is horrible since I should have been keeping up with them throughout the year. Since my goals were not 'in front of me', I forgot what I had written down, and I didn't have a plan to reach them. So, needless to say, many of my goals went unachieved.
Now, with 2016 around the corner, I have to re-evaluate my goals. Do I want to simply carry over my same goals from this year that I didn't achieve or create new ones? What will be the plan to make these goals achievable?
As I posted previously, I have stumbled into the planner community. I discovered bullet journaling and truly feel this method will work for me. I also came across the Get to Work Book - which is a planner designed to help you tackle projects/goals and break them down into action items each week or month. I believe that if I combine these two concepts - I will actually achieve my goals and keep myself on track. With that said, what am I going to be reaching for this year?

Here are my initial goals:
- Blog at least once a week. Share projects, ideas, and what I've been up to.
- Finish Nathan's first year baby album. Currently on week 9.
- Exercise once a week - 1 hour minimum
- Bedtime: no later than 11:30pm
- Read the Bible and daily text - daily
- One cup of coffee a day
Similarly for blogging - something once a week - I will plan a day and time each week of when I will do this. I hope this will keep me on track.
For the daily goals, I don't want to have to track it since I know I will get frustrated if I forget to mark it each day. So these, I will just have to keep myself accountable and try to pick a time each day I will do my reading.
So this is my initial plan for 2016. I decided to keep my list short this time to see if I can keep up. I hope with the exercising and new bedtime - I will feel better and have more energy to do more things for my own self development. I have a separate goal list for work which I will approach the same way - schedule time each week to work towards the goal and track my progress.
Keep an eye out for future posts of how my bullet journal is working out and how I'm doing with these goals. Hopefully you will see more posts from me and are still inspired by the projects I create.
Thanks for sticking with me.
Ezlie
Subscribe to:
Posts (Atom)